Mike Glatzer’s step-by-step guide to rim lighting will teach you to use off-camera flash to make high-contrast studio portraits in black and white!
How to Make Powerful B&W Portraits with Rim Light
I wanted to use off-camera flash to light the edges of a subject and visually cut them out from the background. The twist: doing it in black and white so I couldn’t rely on color as a separator. Ready to learn how I did it?
Getting Started: Rim Lighting in Black & White
There’s something classic and timeless about black and white photography. I don’t know why; maybe because it was the original format of film and photography, or maybe there’s some kind of nostalgia implied when color is stripped from the medium. I find, when shooting in black and white with a rim light, that you have to be simultaneously subtle and more extreme.
Watch for the Subtle Details
Let’s start with subtlety. With black and white photography, the little details matter. Composition and posing need to be simple and clean. Distractions or busy backgrounds will ruin these images by making your audience have epic “Squirrel!” moments. Without color to help drive the viewer’s attention to the subject of a shot, we have to simplify the rest of the shot. So any extra details or features within a shot need to be subtle or subdued to reduce that possible distracting aspect.
Create Great Contrast
As for being more extreme – the name of the game is contrast. Your subject needs to POP from the background. Again, since we don’t have color to help us, we have to rely on composition, posing, and the rim light on the subject relative to the background.
The most significant aid for me in setting up and shooting black and white images is to change the color profile in my camera to monochrome or black and white. If you’re shooting RAW, this is great because you’ll still have the color option when you import your images into Lightroom, Capture One, or your preferred RAW processor. If you’re shooting JPEG, you’ve cut down a step in your editing workflow. By putting your in-camera color profile to monochromatic/ black and white with rim light, you can see how your subject looks relative to your background and work with intent in real-time. It helps remove the difficultly of pre-visualizing your shot without color.
Honestly, I’d argue you could shoot this way for all your work to get good at making compelling compositions and simplifying your backgrounds. Unfortunately, I’m a color fiend, and I gotta see what the tones are doing, so it doesn’t always work for me. (Sorry; “Squirrel!” moment.)
Mike Glatzer Photography
How I Made Killer Studio Portraits Using Rim Lighting
My goal for these images was to specifically light the outer profile and curves of the body. I also didn’t want to completely lose the detail in the body of my subject, but it needed to be subtle so it didn’t distract from the light edges. I gave myself two personal constraints: don’t light the background separately (this would be cheating), and don’t use color.
My Gear
For those suffering from G.A.S. (Gear Acquisition Syndrome), here are the tools I used to knock out these images:
- Black muslin 10×24′ backdrop
- 34″ silver beauty dish with grid
- (2) 10×24″ stripboxes with grids
- (3) flashes
- (3) single light stands
- camera
- 50mm lens
- 85mm lens
Side note: I’m redacting which flashes, camera, and lenses I use because I want you to focus on the light modifiers – not specs or my brands of choice. The specifications of these tools make zero difference in how these images were created. Deal with it.
Key Principles
The key to using rim lighting with these images was rim light control, which meant grids. Grids are excellent for flashes because they help narrow the spread of single light. Unlike shooting with an umbrella where the rim light goes EVERYWHERE, grids are used on bare flashes and in conjunction with other rim light modifiers to help control where the rim light goes.
Think of a grid like a spray nozzle of a hose. Turn the nozzle one way, and the water spray covers a wide range. Turn the nozzle the other way, and the water spray turns into a direct stream. That direct stream is what a grid does to your flash. Why is this important for these images (and light in general)? Because I wanted to highlight my subject (the incredibly talented Jill) without using light in the background.
Typically you can solve this by moving your subject away from your background. However, I was working in my home studio, which meant my subject was standing two feet from the backdrop, my light setup were maybe two to three feet from her, and I was standing in my closet to get a full-body portrait without lens distortion. Not fun. If you ever work with gels, you’ll also learn then that lighting control is crazy-important. I’ll get into gelling your flashes in other posts because I LOVE using gels to get color into my shots. But for now: black and white.
Setup #1
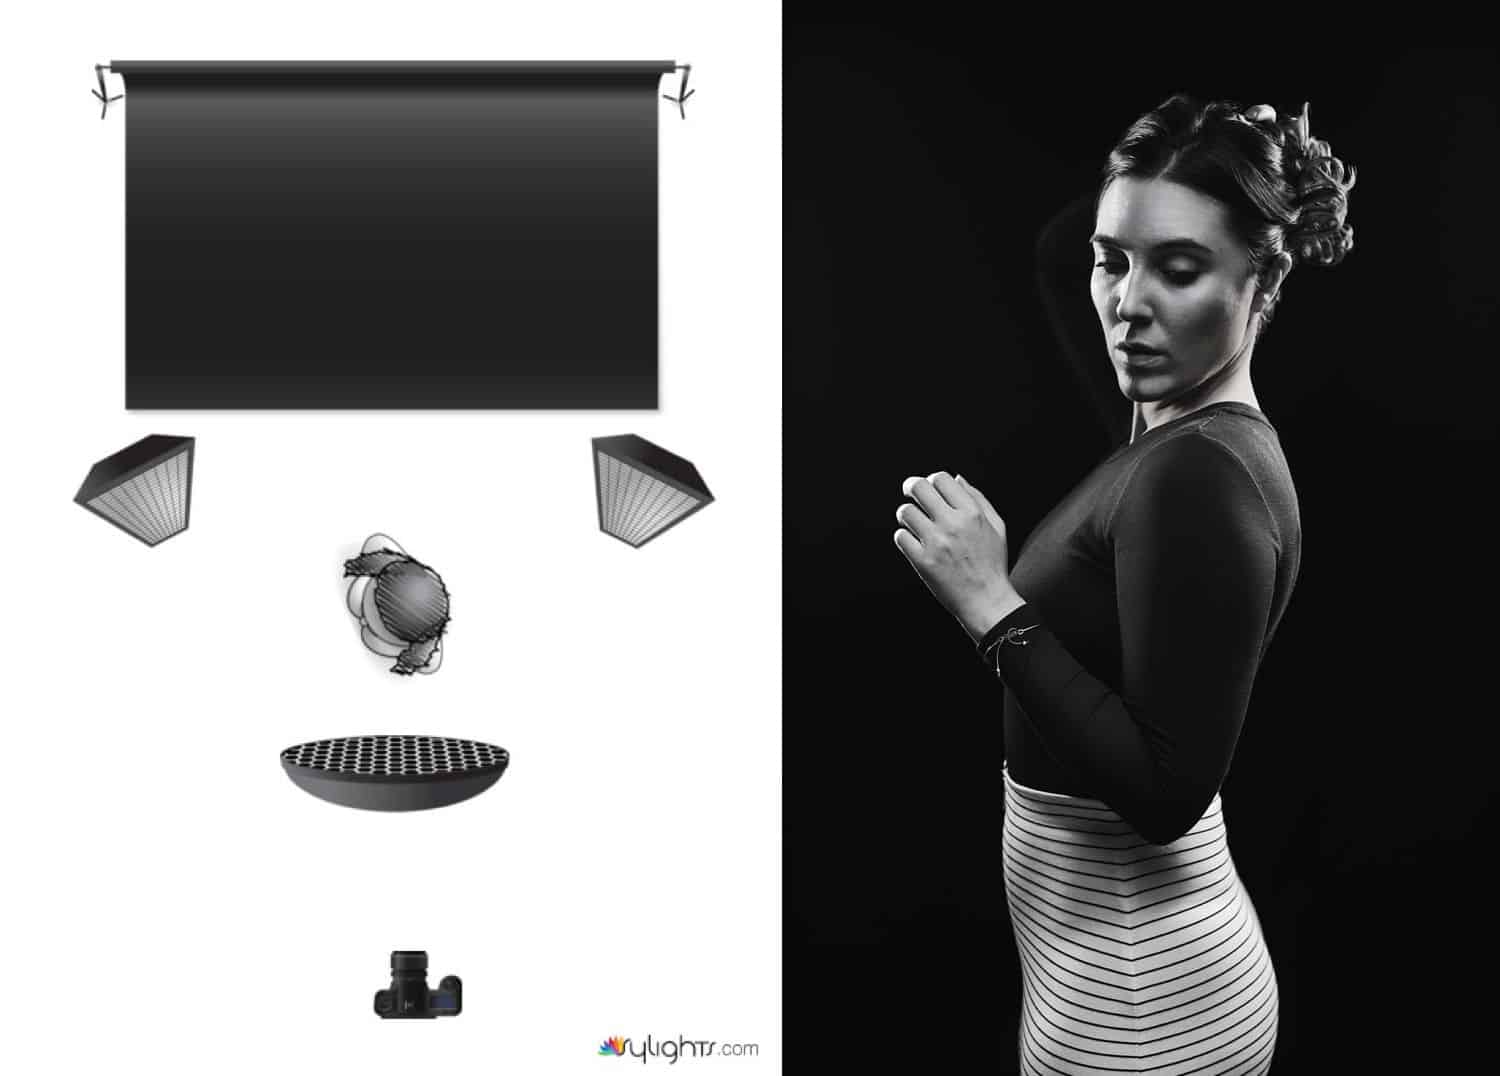
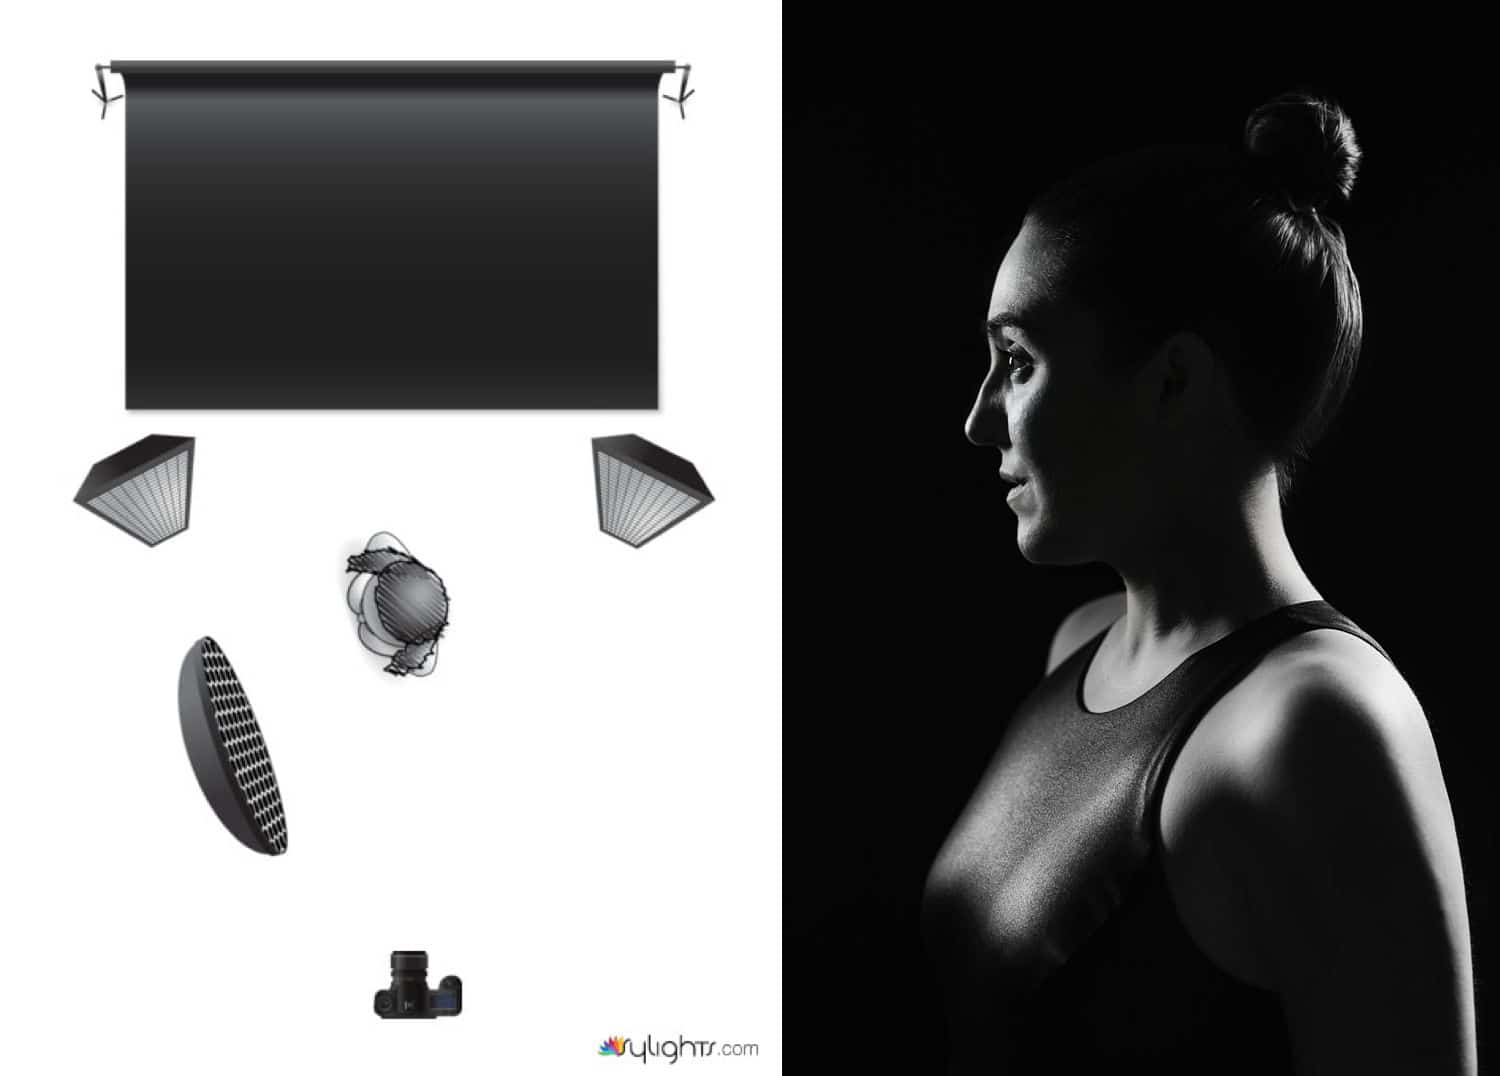
I wanted to start with something easy to get into the groove and make Jill comfortable with this lighting concept. For these first images, I used a three lighting set-up.
Mike Glatzer Photography
First, I placed two 10×24″ gridded stripboxes behind Jill, to her left and right, facing in and towards the camera. That way, the light would create highlights that would accent Jill’s profile. You see this photo lighting used a lot with athletes to create an edgy, harsh look. I aimed the light towards the camera to ensure they didn’t light the background and so that the rim light would fall off towards the camera, making for a more pleasing light to shadow transition zone.
#ShootProofPRO Tip: Choosing Your Softbox Size
One fun fact is I purposefully used smaller stripboxes as my accent lights. If you look, you’ll see Jill’s hair and shoulders are much brighter than her legs. By using small modifiers, I made her upper torso nice and bright, but as the rim light fell away outside the range of the stripbox, Jill’s body would melt back into the background. Just a fun photography effect to give the illusion of Jill melting into the scene.
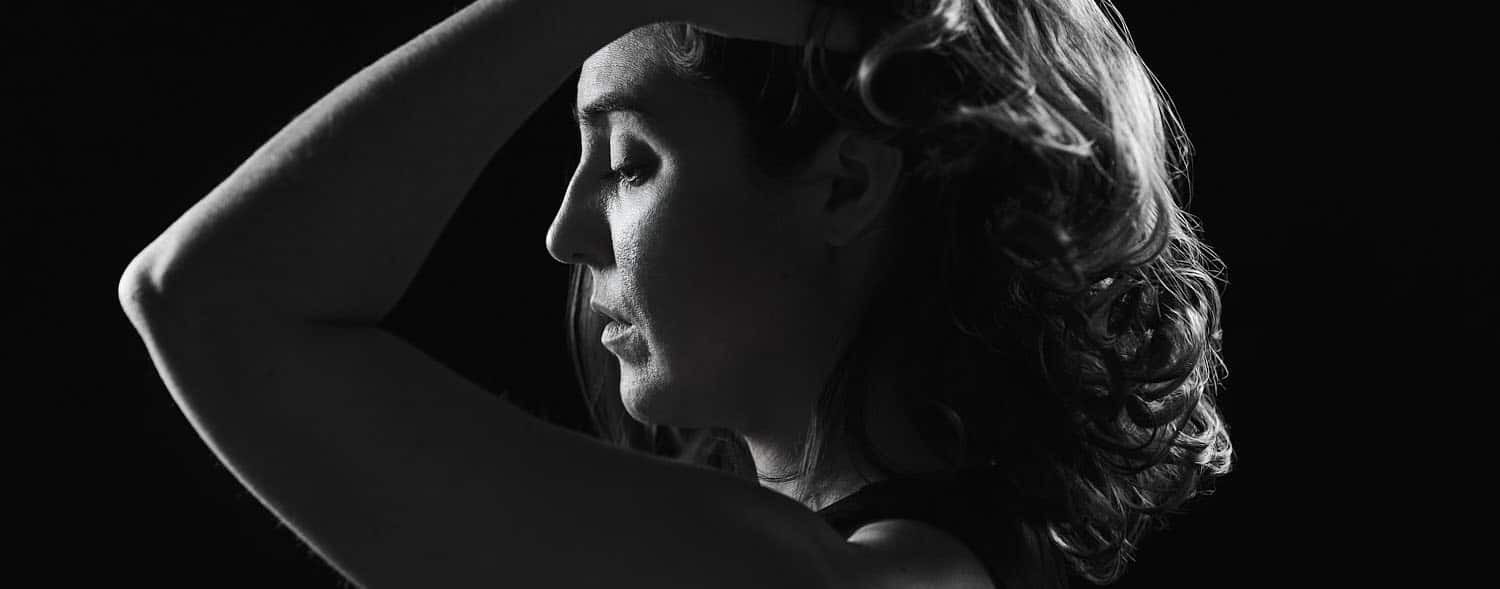
Next came my key rim light, a 34″ gridded beauty dish. I placed this rim light directly between Jill and me, just above her head and out of my frame, and pointed almost straight down (the diagram sucks at showing this, sorry).
Why aimed straight down? To keep the rim light off the background and to make Jill’s cheekbones super-defined. Top-down lighting creates some stunning light effects and is a staple in beauty-type shots. This light really accents your subject’s facial features, but you gotta be sure to angle the light towards your subject a bit (or use a reflector down low to provide bounce-fill). Otherwise, you’ll get raccoon eyes because there’s no rim light illuminating the subject’s eyes.
Mike Glatzer Photography
#ShootProofPRO Tip: Get Rid of the Ambient Light
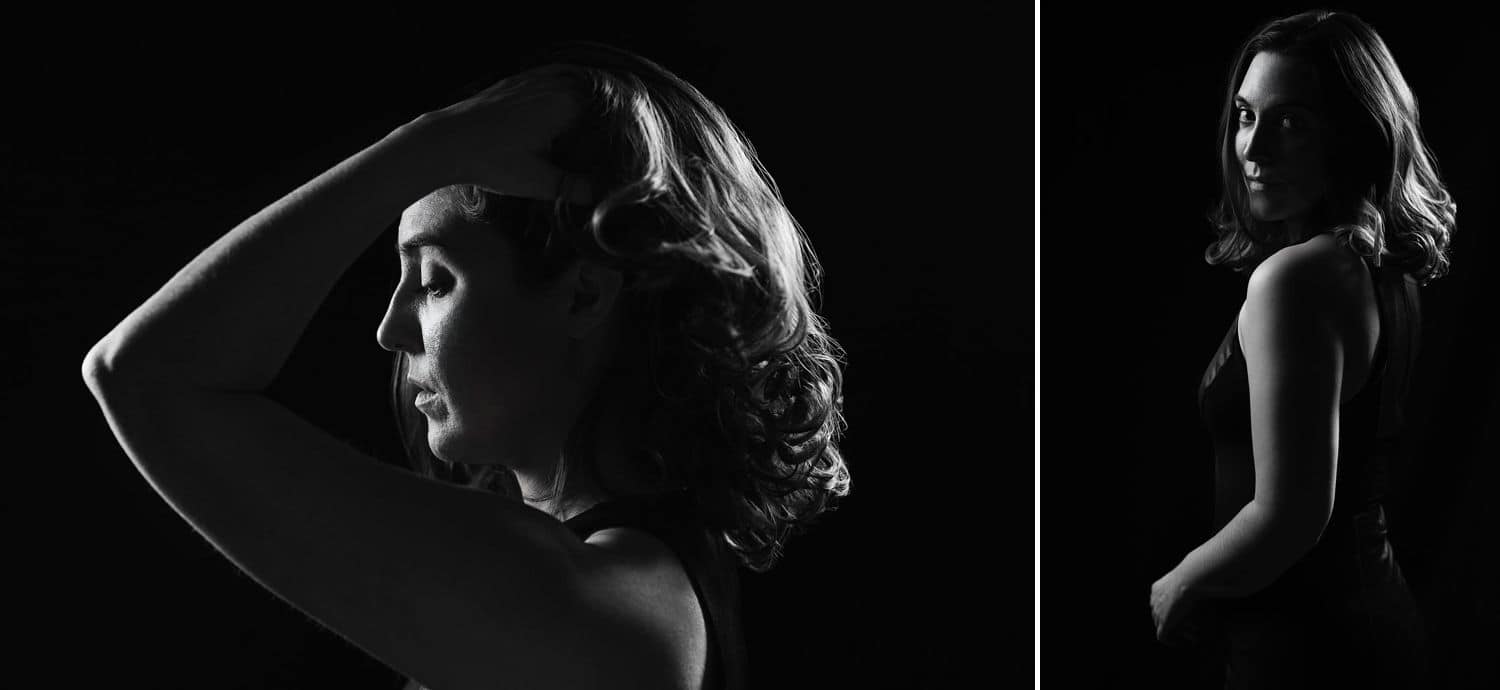
My camera was set to its max sync speed of 1/200, to make the background as dark as possible. I also shot these at f/2.8 because I wanted both eyes in focus but not much else. ISO was 100 again to make the background and ambient light as dark as possible. Essentially, these images were lit only with my flashes.
Setup #2
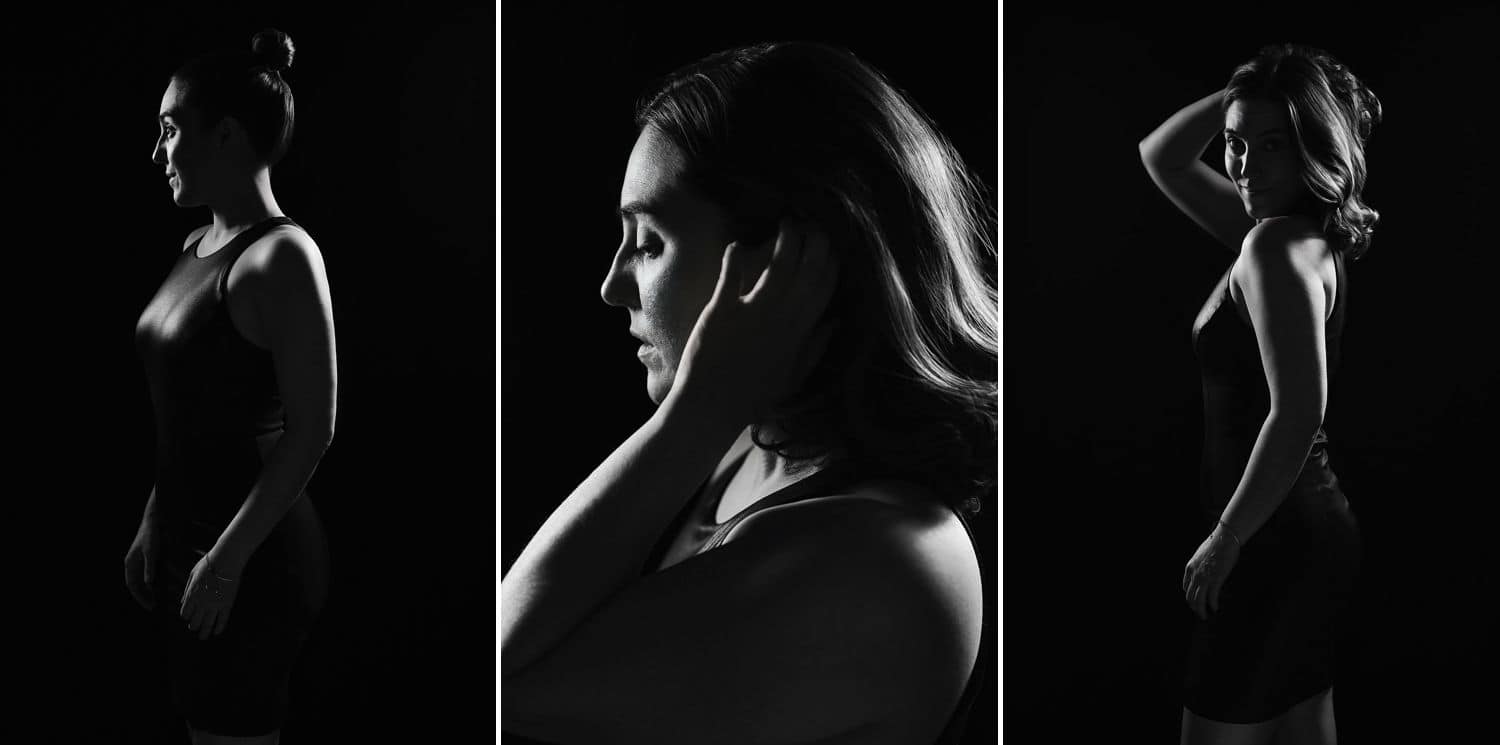
Same basic light set-up as with the first shots, but this time I moved the beauty dish camera-left and oriented it so the rim light would spill horizontally, left to right (the usual way you use a strobe light).
Mike Glatzer Photography
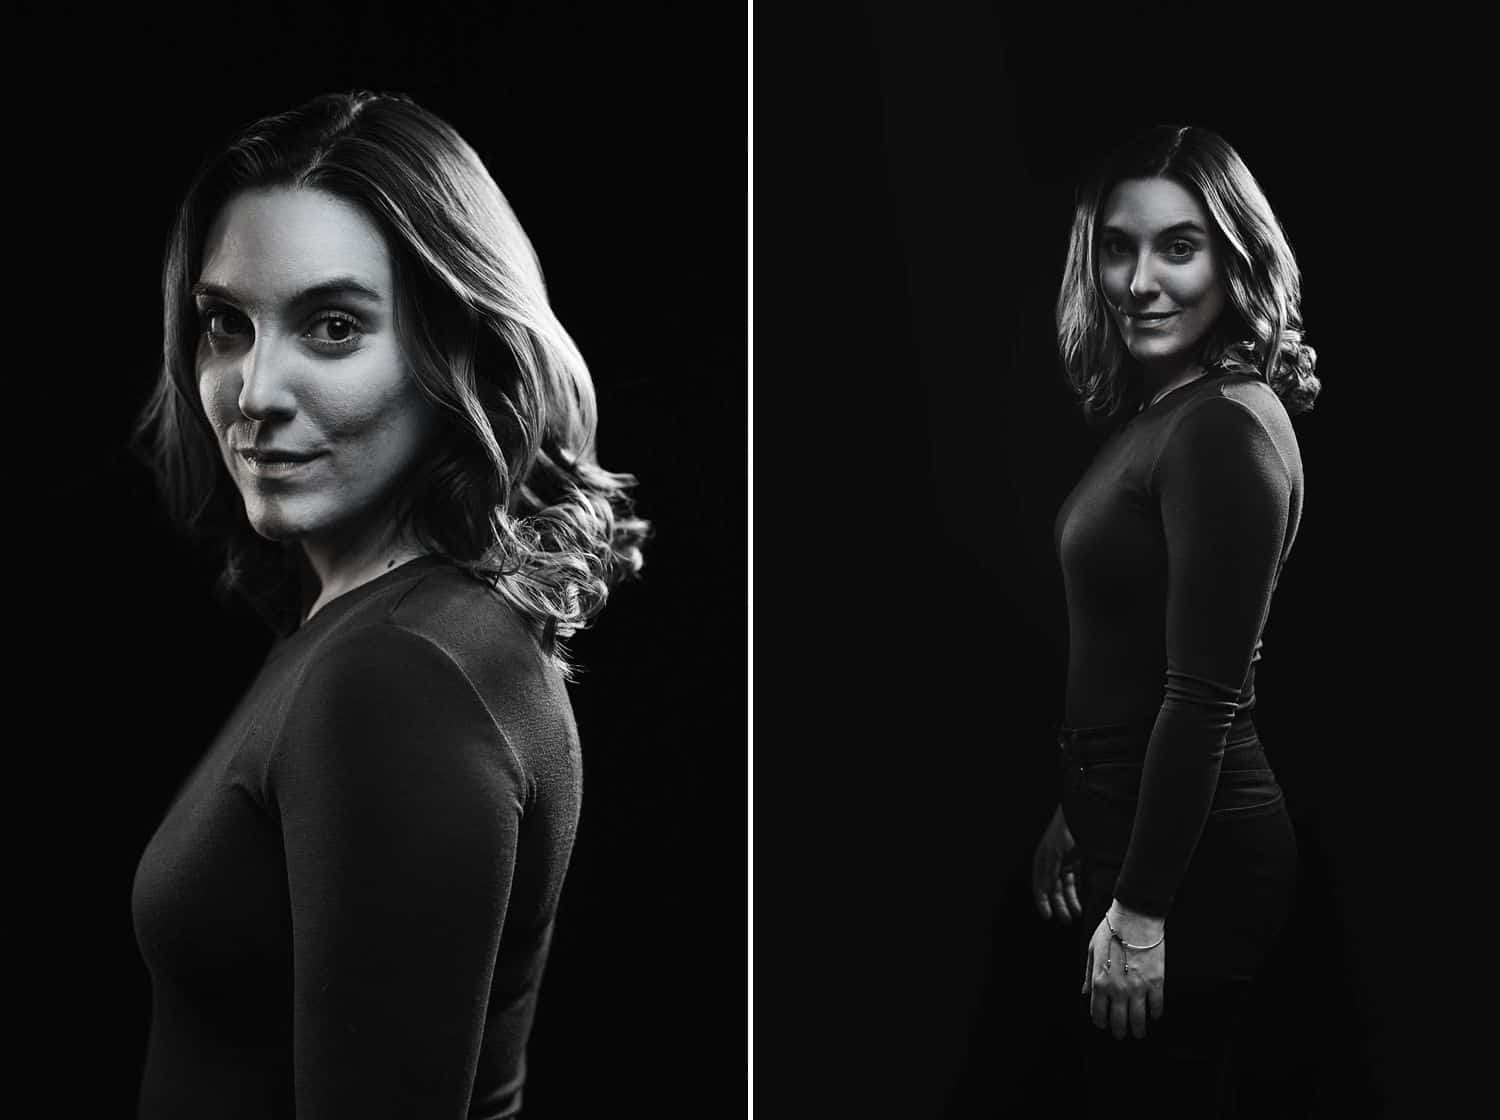
Now, you may be asking why I need that beauty dish light in front of Jill if I already have that stripbox basically doing it? Simple: I needed more rim light on the shoulder nearest the camera.
One of my favorite tricks is to put my fill rim light just a few feet away from my key rim light, but fire in the same direction. This allows me to fill in some shadows with light without making the overall direction of rim light look unnatural. It looks bizarre to have your rim light coming from two different directions (it’s a rookie mistake and how you can instantly tell if someone is good with off-camera flash).
Mike Glatzer Photography
The power on the beauty dish is turned way down relative to the power of the stripbox light flashes so that it’s just adding a hint of light. That’s all fill light is: using a flash light as a real-life shadow recovery slider so you can still see details where your key rim light isn’t illuminating.
Setup #3
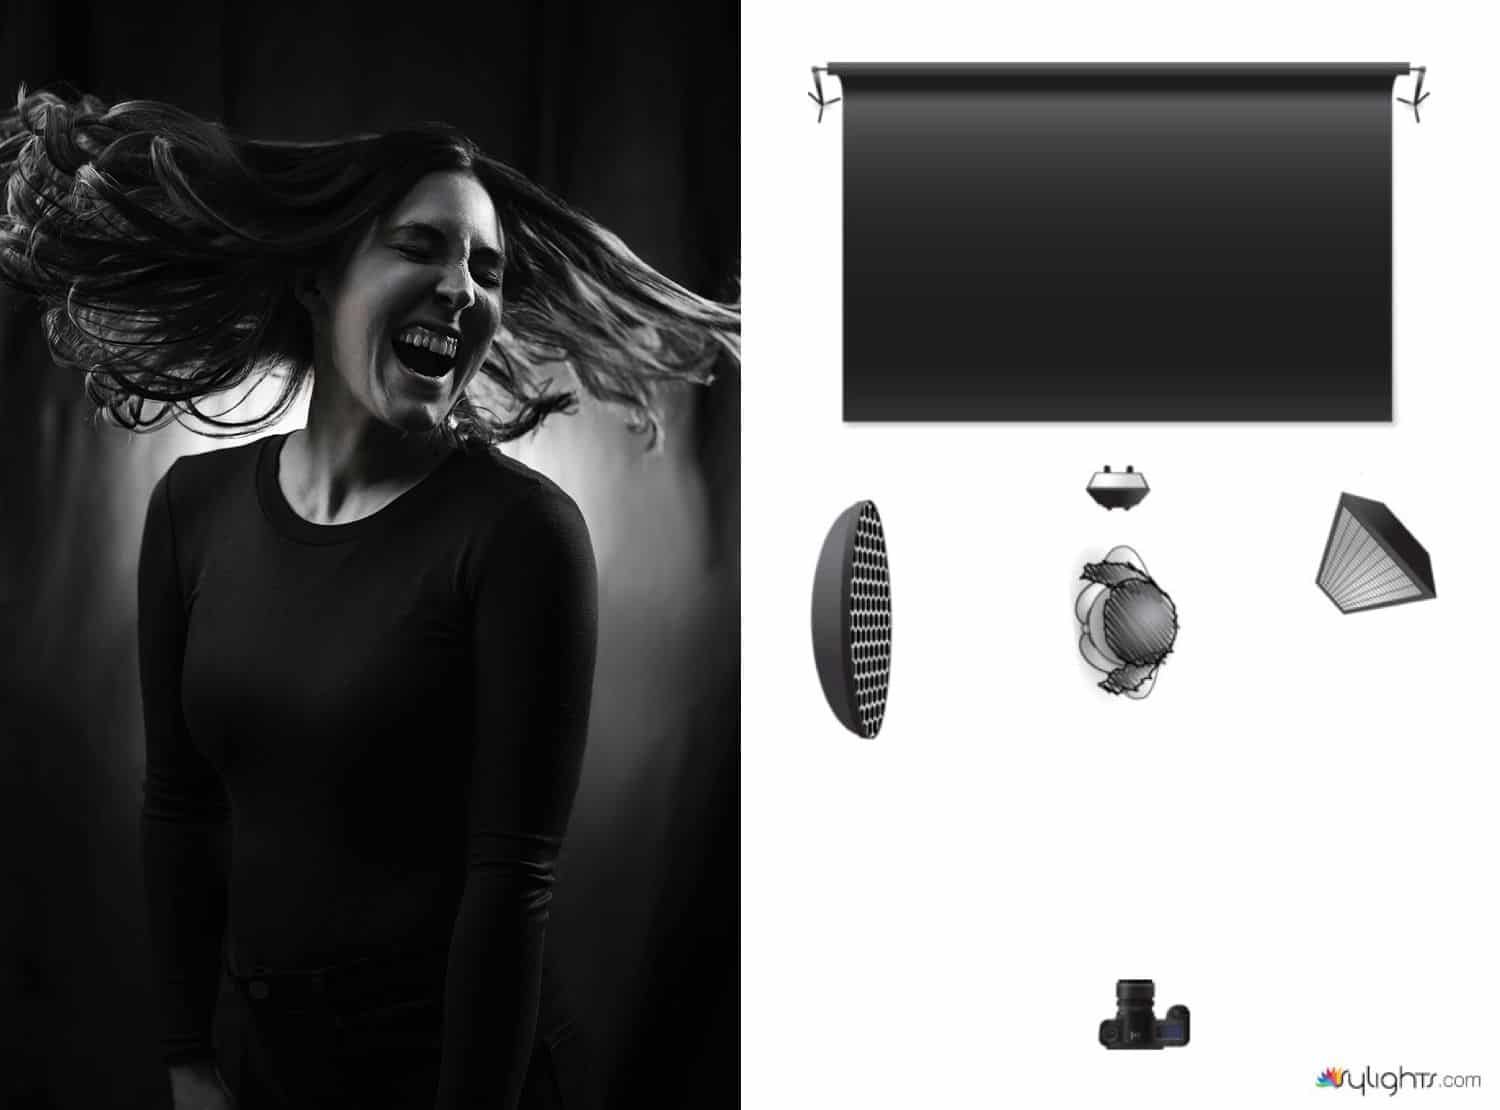
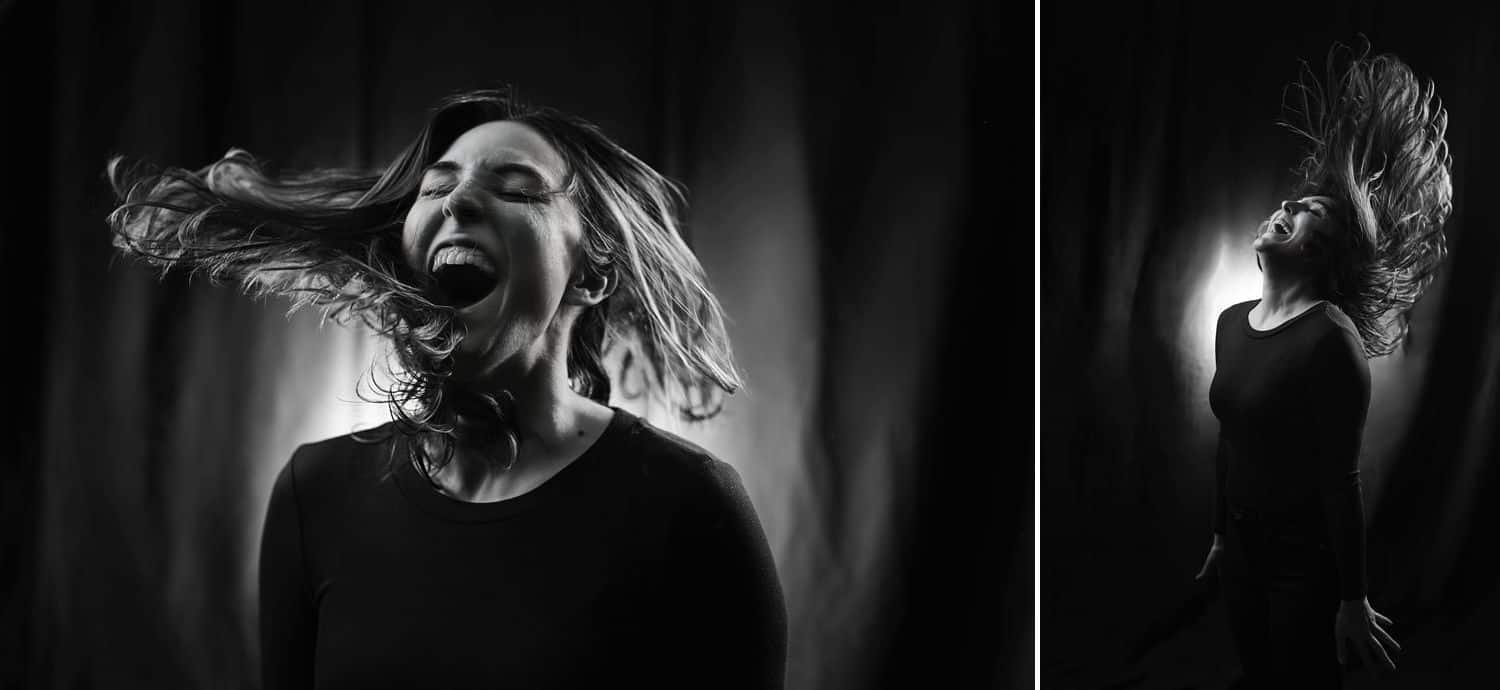
Okay, I broke one of my constraints for these images. I added a light that was pointed directly at the background. Why? Because Jill asked for these shots (not part of my original concept), and I knew they wouldn’t look nearly as cool without that background light to separate her hair.
The right side stripbox wouldn’t have been able to get enough rim light into her flying hair to make it pop out, so a background light was needed. Pretty simple: I put a speed light on a light stand at Jill’s shoulder height and aimed it straight at the background.
Mike Glatzer Photography
I replaced the left stripbox with the beauty dish because I no longer cared about rim light spill on the background, but mostly because I needed a larger light source to accompany more Jill! Hair makes people tall! I also wanted more rim light to hit her nearside shoulder and face as it turned towards the camera.
Hilariously, these are my favorite shots of the entire session. Primarily because if I can catch my friends making goofy faces and being silly, it makes me happy. And the shots look freaking awesome.
#ShootProofPRO Tip: Prepare Your Backdrop
Quick note: if working with a cloth background, make sure you steam or iron it before firing a flash or a light directly at it. I think I spent more time editing out wrinkles in the backdrop than retouching the rest of the image. I definitely wasn’t expecting that based on my original concept. Thanks a lot, Jill…..
Mike Glatzer Photography
Are you ready to try?
If you’re looking at these images and thinking, “There’s no way I could do this!” Believe me, you can. Grab a buddy, pet, or unwilling family member, and just PLAY. Experiment, try stupid stuff, do things that should be wrong. That’s how I learned, and it’s how I conduct many of my shoots.
All of my subjects have heard, “Hmmmm. Let’s try something stupid. Hang on a second,” at the end of their sessions. Sometimes it fails, and sometimes we get amazing photos. Push yourself to try new things, and don’t be afraid of failing; it’s merely an opportunity to learn and grow.
I hope you found this rim light guide educational and informative!
If any diagrams or explanations I provided are unclear, leave a comment below, and I’ll do my best to answer your questions!
Written and photographed by MIKE GLATZER
Mike Glatzer is a multi-passionate creator. Freelancing as a lighting and story-obsessed portrait photographer based in Atlanta, Georgia, Mike also works full-time as a biomedical engineer designing medical devices. He moonlights as a bookworm and theater nerd to stay sane.

Learn more!
Comments