
You just booked your first wedding.
Now what?
Maybe you’re feeling a little nervous – worried about lighting the reception, posing a slightly-awkward couple, or choosing the right lens for the ceremony.
We’re not going to help you with any of that. Time, experience, and experimentation will earn you your style and technique.
To rock your first wedding, there’s one thing you must do: prepare for chaos. These wedding photography tips for beginners will help you do just that!
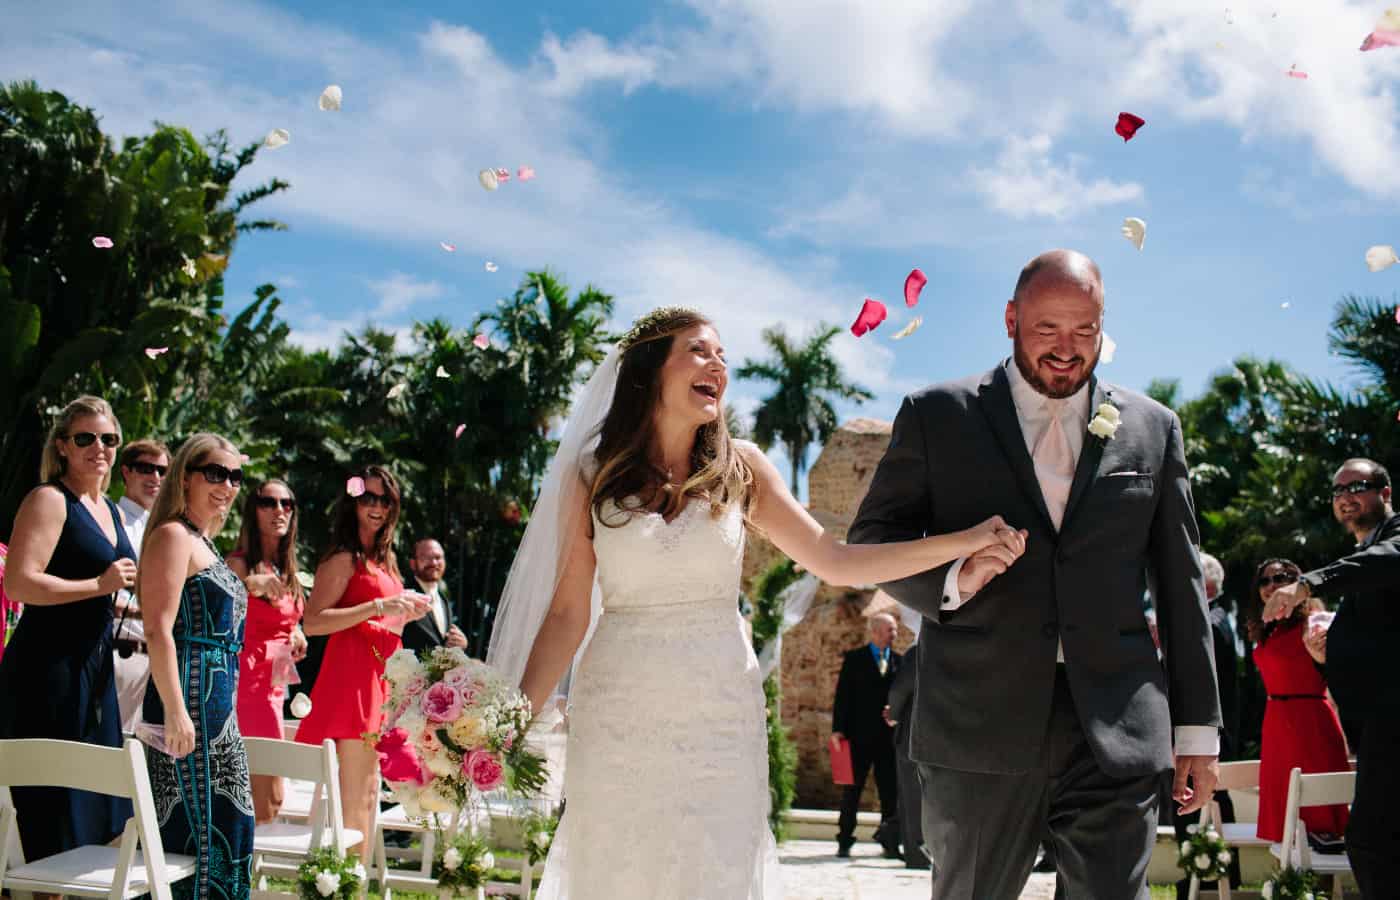
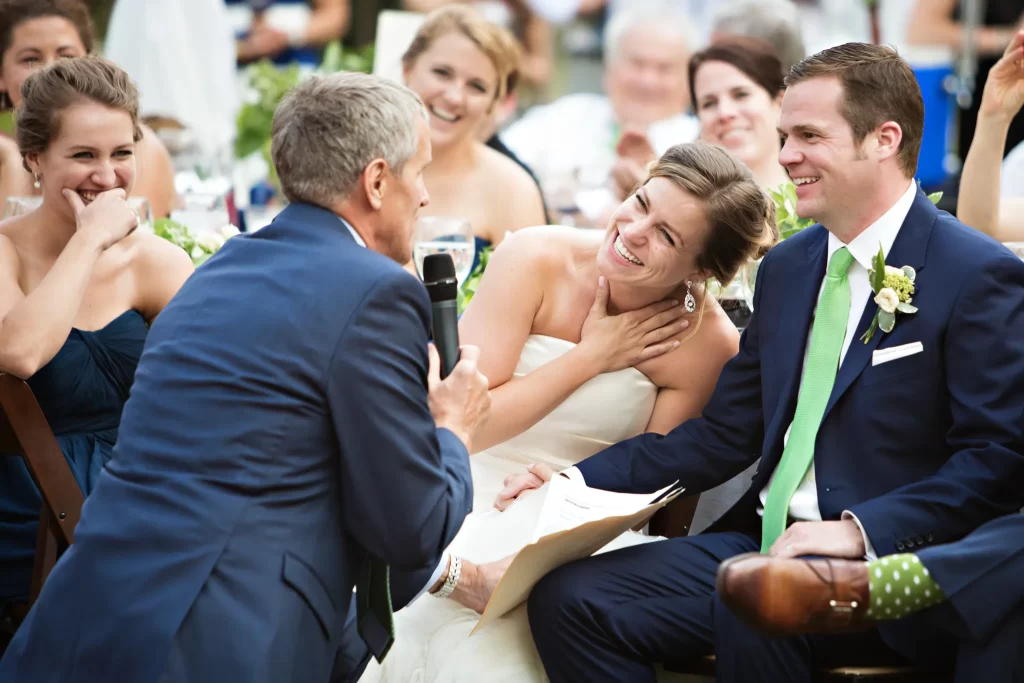
Photo by EM + STEVE POGOZELSKI of POGO PHOTO
With the right prep, you’ll manage even the craziest celebration with class – and create beautiful photographs despite the challenges.
Start your free trial with ShootProof
Tip #1: Make It Legal
One of the biggest beginner mistakes a photographer can make when photographing weddings is not having a signed contract. When you have a legally binding contract, it sets an agreement between you and the client.
When your client signs a contract, it means they agree with your role and responsibilities for the wedding. The contract clearly states your tasks and what your clients will receive. It serves as a protection to both parties, especially since there’s money involved.
If you haven’t already, make your booking legit with a signed contract and paid retainer. You can do both through ShootProof, using an attorney-drafted contract template from ShootProof’s Marketplace and the Invoices feature.
If you’ve already collected a signed contract and retainer: congratulations! Level up!
Tip #2: Keep Your Lines of Communication Open
Behind every scheduled wedding photography shoot is a series of inquiries, bookings, and payment discussions. It all starts with effective communication so that you can do all the necessary preparations and set expectations with the client. Make sure that clients have a way to contact you; may it be through phone, email, or social media.
Respond Quickly
When you’re just starting out, it can feel scary replying to messages. There are cases when the client won’t respond right away, which might make you nervous that you said something wrong.
Don’t worry, this is normal. Remember, your couples are in the middle of planning a wedding, so they have a lot going on! Even though they might take awhile to reply to you, it’s important that you focus on answering them as quickly as possible. The better the experience you provide them throughout the process, the more likely they are to refer you to friends!
Send a Questionnaire
Leading up to the wedding, send your couple a detailed questionnaire asking questions to help you fully understand what will be happening on their wedding day. Make sure you know exactly what time coverage begins, the locations you need to be throughout the day, the names of important family members and those in the wedding party, any specific images your client envisioned, and when coverage ends.
Additionally, use questionnaires to learn more about your couple. Find out where they met, their proposal story, and why they chose their specific wedding venue. All of these unique details are great to use when creating a blog post after the event!
Get clients. Get paid. Get happy.
Set Up a Meeting
About 2-3 weeks out from the wedding, set up a meeting to connect with your couple. This can either be done in person or on a FaceTime call, depending on what’s most convenient for them and you.
It’s great to actually have face-to-face time with your client before the big day, especially if you didn’t do an engagement shoot with them. This gives you an opportunity to review the timeline in person, ask them any last minute questions, and help relieve any nerves they might have.
Tip #3: Create a Workflow
Being a wedding photographer doesn’t mean just shooting events. Most of the time, you’ll be busy handling the booking process, email communication, post-processing, and delivery of orders. If you manage all of this by yourself, find ways to streamline your workflow.
Use a Studio Management Software
Looking back at the first two tips, you might see that client communication and contract signing are crucial parts of the business. With the help of studio management tools, such as ones found in Táve, you can send automated messages to guarantee your clients get responses, questionnaires, and contracts on time.
Studio management software can also aid you in managing a workflow. Most tools feature a dashboard that gives you the ability to make a wedding photography timeline. Assign deadlines for each task, so you’ll know which ones you must prioritize. When it comes to photographing weddings, deadlines are extremely important!
Tip #4: Develop Your Shot List
This is not your client’s shot list!
This is the list of photographs you want to take before the day is over. What do you expect of yourself?
Photo by EM + STEVE POGOZELSKI of POGO PHOTO
Develop a well-curated list of no more than 25 “must-haves” – and memorize it. Making these photographs should be second-nature.
If you’re constantly referring to a piece of paper while photographing the wedding, you’ll be distracted and miss real moments. But if you have a gut-sense of what you want to capture – and what you should be capturing – you’ll be fully present and wholly invested in the creative process.
As a photographer, it’s your job to take photos you know are necessary for events while also accommodating some requests from the couple.
One of the common mistakes of a newer photographer is relying on instincts alone. While you may have superb memorizing skills, there’s still a chance you might forget to shoot something during the event, especially if it’s something you didn’t think of in the first place.
Get started with ShootProof
To help you prepare and practice, here are some wedding photography tips and ideas for images you can take throughout the big day:
Detail Shots
When you arrive during the preparation, the couple, family, and wedding party might just be starting with hair and makeup. This is a great chance to take photos of details like:
- Close-up shots of the rings, cord, and veil
- Bouquets, corsage, and other flower arrangements
- Invitation
- Hanging dresses and suits
- Shoes
- Perfume, jewelry, cufflinks, and other accessories
Maybe the grandparents made the bride’s bouquet. The groom’s tie might be a hand-me-down or heirloom. Perhaps the couple bonded over designing their invitations themselves.
While they look like simple items, there might be deeper sentimental value. These things serve as important reminders of the personal details of the wedding. Make sure to include these in your shot list because you’ll never know what emotions may stir from seeing the images.
Bridal Coverage
The bridal coverage highlights how the bride prepares for the wedding day. It’s also about spending time with the special friends in her life. Carve out at least an hour to capture the following:
- Bride, maid of honor, and bridesmaids getting their hair and makeup done
- Parents helping the bride with accessories
- Maid of honor and bridesmaids having fun with the bride
- Bride putting dress on
- Group shots with the family
- Creative shots of the bride beside a big window, in the staircase, or other stunning areas at the venue
- Boudoir shoot if the client requests it
Groom Coverage
Like the bridal shoot, coverage of the groom documents the guys preparing for the event. It’s also about having fun with the groom’s best friends. Allocate at least 30-45 minutes to shoot moments such as:
- A ‘cheers’ shot with some beer or scotch
- Groom putting on jacket, tie, and cuff links
- Family shots
- Solo pictures of the groom
- Quirky shots of the wedding party
Ceremony
Keep in mind that what happens at the ceremony is out of your control. It’s your job to be attentive and shoot what goes on to the best of your ability. The ceremony is the most challenging and essential part of the day, so equip yourself with the right gear and information.
Get a Copy of the Ceremony Schedule
First things first— get a copy of the program from the clients or coordinators. While every religion’s wedding may have similarities, there might be parts of the ceremony that you’re not familiar with. Thus, you need the actual timeline of the event.
When photographing wedding ceremonies, it’s your job to know how the ceremony will unfold, so that you can move to the right spot at the right time. From the processional to exchanging vows and rings to the first kiss, it’s less likely that you’ll miss moments if you’re aware when they will happen.
Clarify Wedding Traditions
As a photographer, you’ll encounter many religious and cultural traditions. You’ll need to know what to expect, especially if there are rules that you also need to follow.
Depending on regional or religious traditions, you may need to adjust your coverage so you’re inclusive of various guidelines.
A Hindu wedding, for example, may span multiple days. Meanwhile, Catholic weddings also include the Liturgy of the Eucharist or Communion during the ceremony. As you can imagine, a lot depends on the faith tradition, which is why you must be aware of key details beforehand so you’ll know how to act and shoot.
The Must-Have Shots
Whether the wedding is civil or religious, it will likely follow a general outline. What’s vital is that you capture each important aspect:
- Processional for wedding party walking down the aisle
- The groom’s reaction when the bride walks in
- Bride walking down the aisle
- The officiant’s opening remarks and address to the couple
- Exchange of rings and vows
- Pronouncement of marriage
- Front and center angles of the first kiss (You must not miss this!)
- Reaction shots of the family, friends, and guests
- Recessional or the confetti-filled exit
- Signing of the ketubah or other marriage contract
Group and Family Shots
Group shots may depend on the church’s policies or the client’s preferences. At this point, the couple may just want to head to their cocktail party! So it’s your job to take charge and keep things moving.
To speed things up, work with event coordinators to announce that you’ll be doing formal group photos. Aside from the official bride and groom photos, here are a few standard group images to take:
- Bride and groom with the officiant
- Bride and groom with each set of parents
- Bride and groom with each immediate family
- Bride and groom with each extended family (grandparents, aunts uncles, cousins, nieces, nephews)
By following a sequence, you can streamline the wedding portrait process. Your couple will thank you because you can save them precious party time!
Contracts & invoices for Pros
Reception
The last part of the day where most of the fun happens. Just like the ceremony, the reception is pretty much beyond your control. In general, here are key shots to remember:
- Reception setup and details like table settings, name place cards, and wedding favors
- Cocktail hour
- Grand entrance
- Toasts and speeches
- Cake cutting
- First dance and specialty dances
- Bouquet and garter toss
- Bride and groom interacting with the guests
- Dance floor fun
- Any additional games
- Sparkler exit
Look for the Action
Unlike photographing a wedding ceremony where the majority of the guests just sit and stand, the reception lets people move more. Unless it’s part of the program like cake cutting or the first dance, the reception is filled with opportunities for you to take candid photos.
Take a step back and observe where the fun is happening. Is it on the dance floor or photobooth area? If you hear people laughing and chatting over at a table, head over to that area to get authentic smiles.
Being a wedding photographer means you can pick up on little, unexpected moments. Be on the lookout for situations that no one else might notice but will certainly make a good memory for the couple.
Don’t Forget the Composition
Some wedding photographers still struggle with composition. During your first time shooting a wedding, you might experience some common challenges.
Take an extra minute to pause and examine your composition before snapping the photo. Make sure there aren’t any major distractions in the shot. If there are, look for different angles that you can shoot the scene from instead.
Use People and Things to Frame the Bride and Groom
To give you a fresh perspective, look at existing frames at the venue. This means elements like a window or an archway that serve as the background. Architectural elements can balance the composition and add symmetry to photos.
Another great way to take creative shots of the couple is by using guests as a foreground framing device to give more context. In this way, you can also show how people react or pay attention to the ceremony.
For instance, look for the parents or siblings and capture the moment they wipe their tears during the couple’s exchange of vows. You can also anticipate the guests’ reactions when the couple is about to cut their cake!
Move Like The Wind
During weddings, one of your goals is to move–fast! Even if you need to take close-up shots of guests, do it in a respectful manner that won’t disturb or annoy people. Also, turn on your camera’s silent shutter mode if you have that function to minimize noise when you take pictures.
Practice Before the Event
Practice shooting before the big day, especially if you’ll be using a new camera or lens for the first time. Read articles or watch videos about wedding photography. If time permits, you can even go to the actual venue and take some photographs.
Tip #5: Organize Your Gear
Do you have the gear you need to make the photographs you plan to make? Maybe you want to make macro photographs of the couple’s rings, but don’t own a macro lens. Plan ahead to purchase or rent one!
Photo by EM + STEVE POGOZELSKI of POGO PHOTO
The Basics
As a wedding photographer, it’s imperative that you bring the essential gear, including:
- 2 camera bodies (can be DSLR or mirrorless)
- At least 2-3 lenses with different focal lengths
- At least 1 flash with a diffuser
- Memory cards
- Chargers and spare batteries
- Tripod
- Reflector
- A camera bag to keep all your gear organized
Backup Equipment
Have plenty of memory cards (or film), batteries, and backup equipment. Even the latest and greatest camera can fail when you least expect it. Be prepared with a second camera and lens(es). Make sure this backup gear is accessible while you’re shooting – not hidden away in the back of your car. That won’t do you any good if your camera zonks out midway through the ceremony!
See how to earn money with ShootProof
Don’t Rely On One Battery and Memory Card
One of the worst things that can happen while photographing a wedding is running out of memory card space or having a battery die. This is something overlooked by beginners, which results in them scrambling during the event to charge a battery or delete photos.
You can’t ask for the officiant or coordinator to wait for you while you charge, so bring at least two fully charged batteries, as well as multiple memory cards. While it’s okay to charge a battery during an event, make sure that you still have another battery to use so you can continue with the wedding photography.
Have Multiple Lenses
Use a wide angle lens for group shots and interiors and a different one with a longer focal length for candid and portrait shots. If you can’t bring two cameras with you, your best option is to take two lenses with varying focal lengths. Practice changing lenses fast because it can save you precious time.
Rent Photo Gear if Needed
As someone newer to wedding photography, you may not have the resources yet to buy everything you need, and that’s okay! One of the cost-effective ways to shoot quality photos at first is by renting gear. To try before you buy, consider these rental solutions:
Aperturent
Lensrentals
Lens Pro To Go
Capture Integration
Borrow Lenses
Make sure each piece of equipment has a secure, designated space in a bag on the wedding day. Number your bags and pack them consistently to prevent misplacing items or leaving anything behind.
Tip #6: Research Your Locations
Your contract should detail where the ceremony and reception are taking place. Use this information to research photography policies and lighting conditions in these venues. Do an in-person walkthrough if possible, or preview the locations online if the venues are too far away for a pre-wedding visit.
Photo by EM + STEVE POGOZELSKI of POGO PHOTO
Map Out Locations and Know Time Between Them
If you need to cover weddings with multiple locations, mapping out venues and alloting travel time can work wonders. Consider traffic or unexpected delays when you move from one place to another.
Check with a GPS or Google Maps to see the estimated travel time from going to the venue for preparation, to church, and the reception venue. When being hired for photography for a wedding, the last thing you want to do is show up late because you miscalculated how long the travel time would take!
Empower your clients with gorgeous galleries.
Places of Worship
Ask venues about their photography policies! Places of worship, in particular, often have strict rules about when – and from where – you can photograph.
Communicate any restrictions to your clients well before the wedding day. If your clients’ church doesn’t allow photography during the wedding ceremony, for example, setting your clients’ expectations will prevent disappointment later.
Don’t hesitate to ask venue directors if they’ll bend the rules for you (It never hurts to ask!), but always respect their final policy, even if it seems silly to you. Your reputation will thrive or die on the word of industry vendors who work with you.
Inside, Outside, & Green Ceilings
Even beautiful venues can pose unexpected challenges – especially after the sun sets, or if there are no windows!
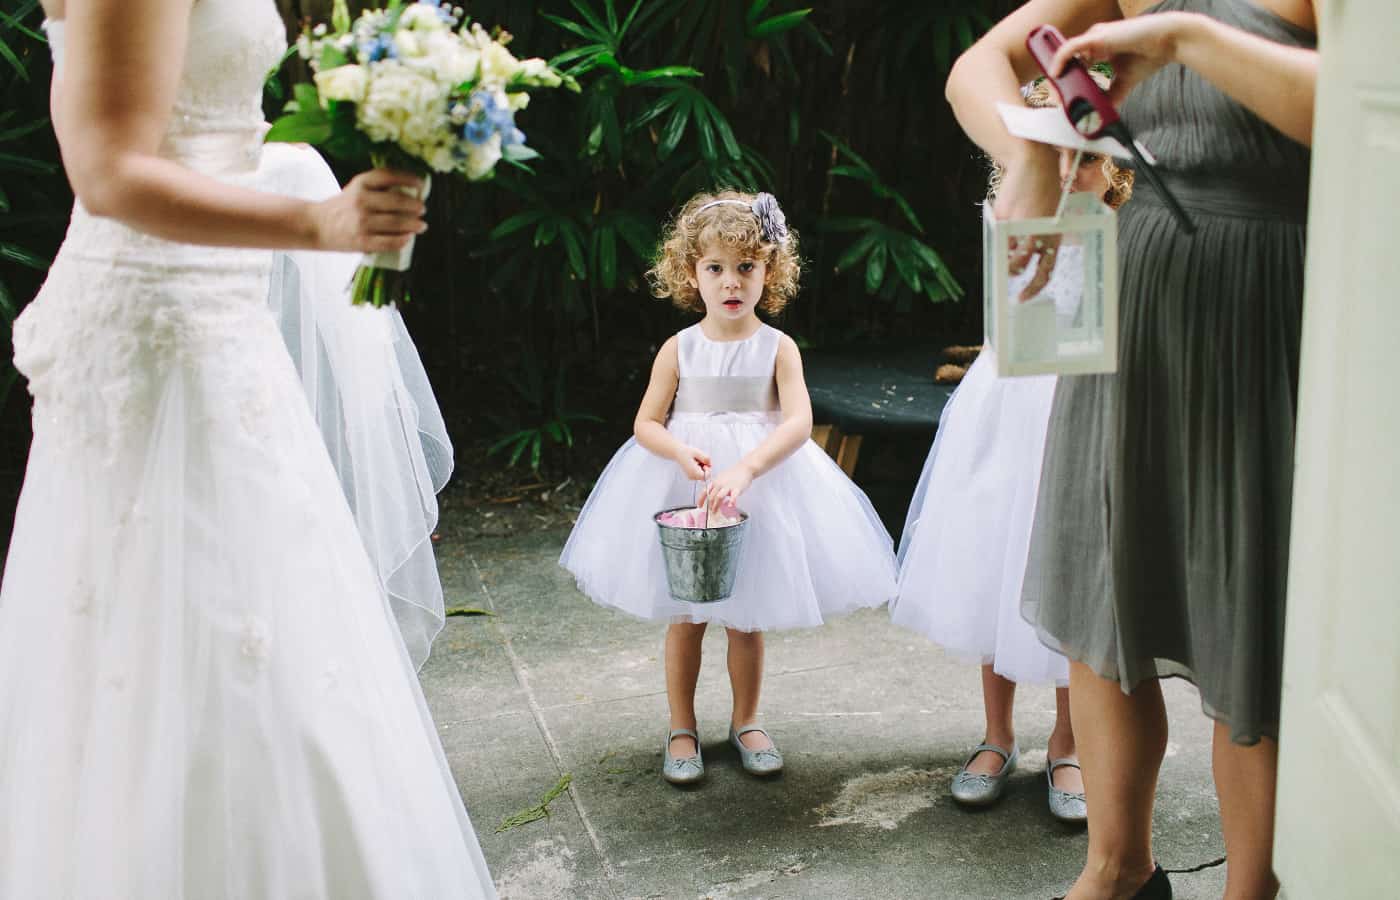
Photo by EM + STEVE POGOZELSKI of POGO PHOTO
How will you handle that ballroom with the green-painted ceiling? How will you photograph that dance floor on the beach once night falls? Do you know where the sun will be during that lakeside ceremony? What is the couple’s rain plan – and are you prepared for it?
Anticipate location challenges before they arise, and you won’t be panicking on the wedding day.
Tip #7: Cooperate With Other Vendors
Other wedding vendors are going to be your best partners at the event. They can either make the job easier or harder, so it’s important that you treat them with respect throughout the entirety of the event. After the event, you can continue building a relationship with them for future weddings!
Build a good relationship with vendors like:
-
- Videographers
- Hairstylists and makeup artists
- Florists
- Bakers
- Officiants
- Venue coordinators
- Wedding planners
- Caterers
- DJs and bands
Exchange Business Cards
It’s always a great idea to pass along your contact information to other wedding vendors. Of course, be courteous and ask for their business cards as well. Design a striking yet professional business card that other people won’t end up tossing aside.
Start your free trial with ShootProof
Incorporate Vendors’ Gorgeous Work
Wedding photographers will likely take photos of details that make up the whole wedding. Remember that your clients paid for other vendors’ creativity as well, so they would like to have a visual remembrance of it.
Photograph the catering team serving food, hair and makeup artists styling the wedding party, or the band performing during the first dance. Other vendors will love you for capturing moments of them in action. Aside from that, images like these spark feelings and memories when your clients see them.
Share Vendor Photos and Tag Them on Social Media
When you upload the clients’ images on social media, tag them and the vendors on the post. In some cases, vendors will share your actual post, which can increase page engagement and views. There are cases when they’ll ask permission to upload photos on their websites, and they will include a backlink to you. Either way, it can result in new client inquiries and partnerships.
Tip #8: Hire An Assistant
No, not a second shooter (though you may have one of those, too). Hire an assistant.
Your photo assistant can:
- Carry and/or guard your gear
- Help set up equipment if you’re using lights or tripods
- Smooth trains, fluff hair, and re-pin boutonnieres
- Bring you a bottle of water so you don’t pass out
If nothing else, a second pair of hands can feel life-saving when you’re in the midst of a hectic wedding.
Photo by EM + STEVE POGOZELSKI of POGO PHOTO
Assistant Etiquette
- When listing an assisting job, clearly state when, where, how long, and how much you can pay.
- Make it clear that you are hiring an assistant – not a second shooter.
- Leave nothing to chance! Tell your assistant what you expect them to wear. No jeans? All black? A suit and tie? Be specific. Your assistant represents your brand while they’re with you.
Tip #9: Prepare Your Emergency Kit
An emergency kit can help streamline the photography process and enhance your clients’ experience!
Bobby pins, a stain stick, a small sewing kit, and baby wipes will handle most minor crises.
Photo by EM + STEVE POGOZELSKI of POGO PHOTO
Larger emergency kits may contain rain ponchos, first aid kits, bug spray, crochet needles (for dress buttons), makeup basics, spare bow ties, lighters, a list of emergency phone numbers (backup vendors and photographers), and more. Your imagination is the limit!
Don’t overburden yourself but pack what makes you feel prepared and comfortable. Your assistant can help you manage this extra bag!
Tip #10: Use the Right Camera Settings
Shoot in RAW
RAW files are uncompressed data files that contain all of the image information. Since RAW data are unprocessed, they look flat and lack contrast. They’re like a film negative!
The advantage is that you get more flexibility and range when it comes to editing your photos because RAW files capture more dynamic range in a scene. All visual information remains intact on the file, so you have leeway in adjusting sharpness, brightness, contrast, shadows, and colors.
Use Varying Shutter Speeds
A fast shutter speed is a good starting point for wedding photography because you’ll capture lots of movement. For starters, set the shutter speed to 1/200 or faster.
Then try shutter priority mode to really freeze moments. Set the shutter speed to 1/500th of a second to capture active moments. You can tweak these settings to capture laughter, dancing, twirling, and other movements.
Get clients. Get paid. Get happy.
Experiment with a Range of Apertures
The aperture dictates what part(s) of a photo are in focus. If you want to show the grandeur of a ballroom, make sure you’re putting everything in the scene in focus. In that case, you’d use an aperture of f/8 or even f/16.
When you’re taking photos of people and details, you can opt for high apertures to create depth by blurring out the background. In that case, try an aperture of f/2/8 or f/4.
On the other hand, lower apertures isolate the subject, making it the whole focus of an image. This is why it’s best to use apertures between f/1.8 to f/2.8 for bridal portraits. In this way, you can bring in more light while reducing unwanted distractions.
Adjust your ISO
Here’s another wedding photography tip for beginners: keep the ISO under 1000 whenever possible to keep the digital artifacting at a minimum. However, you can always increase the ISO depending on the situation, especially in low-light venues. Want to capture the moody glow of candlelight? Consider bumping up your ISO to 3200. An entire ISO range is available at your disposal, so maximize it and try new things!
For indoor weddings, try to keep ISO between 400-800 to achieve beautiful, grain-free portrait photos. If you go higher than that, you may get more digital noise (though, this depends on your camera, so try a few options).
Tip #11: Show Up Early and Scout the Location for the Best Light Source
One of the best wedding photography tips for beginners is to arrive at the venue early. Not only does this give you ample time to prepare your equipment, but also time to scout for shooting locations and available lighting.
When you arrive 30-60 minutes early, you won’t risk working under pressure to get all the necessary shots. In addition, you can carve out time to talk with the coordinators, and other vendors who will work with you during the day.
Whenever you arrive at the venue, one of the first things to do is to check the lighting that might be available throughout the day. There are four common sources of light that you can optimize:
Natural Light
Use natural light as much as possible to provide a gentle, warmer, and softer look for your subjects. Most wedding venues and reception areas have ample window light. Make a mental note of where windows are located.
Golden Hour
Golden hour is a magical time for emotive, evocative portraits of the couple. When the sun is low on the horizon, the light creates a soft and beautiful look that flatters the subjects.
On-Camera Flash
If the available light is dull, a flash can add interest to the scene. Use your flash to illuminate the couple more while filling in the dark shadows. Always check the venue’s unique rules regarding flash.
Reflectors
A reflector is a simple, portable tool to help you bounce and direct light. If the sun is behind the couple, creating bold backlighting, you can bounce some of the light by placing a reflector in the front. In effect, you get more exposure between the couple and the background.
Tip #12: Follow a Post-Wedding Timeline
The work continues after the shoot. In fact, a majority of the job actually begins once the shoot is over!
Make Backups of All Images
A photographer’s worst nightmare is losing photos, either through accidentally deleting files or a corrupted memory card. Make it a habit to copy images to your computer and an external hard drive immediately after the shoot. Yes, making two–or even three–copies is ideal, and doing it the minute you get home from the wedding is the best time to do this.
Cull Photos Quickly
Culling refers to the process of separating the good photos from the bad ones. It’s not about deleting unwanted photos immediately, as you may still need them. The goal is to cut down thousands of images into select photos that you will edit and share with the couple.
The fastest way to do this is by using Photo Mechanic, which was designed for culling images. From here, you can import your final selections into a Lightroom Catalog and begin editing your photos.
Take Advantage of Presets to Speed Up Editing
The editing process is arguably the most time-consuming part of the post-wedding workflow. Editing each image one-by-one can easily take 1-2 minutes per image, depending on how heavily you edit. To make this process easier, use presets to apply multiple settings in bulk to your photos.
Know that applying presets will not magically fix your images. When you use a preset, the editing software will apply a configuration of settings that you can tweak or adjust until you achieve your desired look or tones. Overall, presets can help make your images look more cohesive and consistent.
Post Teasers
After a wedding, make it a goal to upload sneak peeks on social media within 24 to 48 hours. These are normally a few photos that let the client have an idea of what their images look like. Likewise, teasers give them something to look forward to sharing with their family and friends.
The couple, family, and guests will still feel the rush of the event, which makes them excited about seeing images. At this point, you’ll likely get new followers, likes, shares, and comments.
Deliver Photos on Time
If your contract states how long it will take for clients to receive their pictures, make sure to fulfill that contractual obligation. For some wedding photographers, this can range from a few weeks to even as long as three months. This depends on your workflow, although ensure that the client understands how long you work on post-processing and delivery.
Upload an Online Wedding Gallery
Part of your job as the photographer is to provide the best image-viewing experience for your clients. The great thing about uploading an online gallery is that customers can get their photos delivered in a professional, high-quality way. Additionally, this gives them a choice of where to save and download their files.
The great thing about uploading images to a wedding gallery like ShootProof is that it gives couples (and their family and friends) the ability to easily order prints or purchase the digital files. You can create and send out email campaigns to encourage them to buy photos around the holidays or on their one year anniversary.
Give Referral Incentives
Some clients automatically give reviews about a service provider. Sometimes, they will even share a post on their social media accounts. However, you can’t be sure that everyone will find the time and energy to do this.
The most reliable reviews come from actual clients. One way to encourage a review is by offering a referral incentive. For example, you can give a discount on their next booking if they leave a review within the week. Perhaps they can get a print credit if they post a review with pictures.
Get started with ShootProof
Tip #13: Be Real
Forget what the magazines say. Forget the hype and the pomp and the circumstance.
Brides and grooms and their families are just human beings full of feelings. Throughout the wedding process, treat them with respect and humor and empathy.
All Photos by EM + STEVE POGOZELSKI of POGO PHOTO | Find them on FACEBOOK and INSTAGRAM
Don’t try to be someone you aren’t. And don’t try to make your clients be someone they’re not.
Clients will love you, refer you, and hire you again – not only because you make lovely photographs, but because you are a lovely human to work with.
While you’re busy supporting your clients, ShootProof is busy supporting YOU! Join us now!
Rock your next wedding with these helpful articles...

Comments