Let’s imagine you’re at your favorite coffee shop. You’re a regular. They know your name, and they even know your dog’s name. You get the same drink every time. You’ve tried a lot, but the oatmilk vanilla latte is your favorite, so you order that each time and go about your day.
But then one morning everything changes – the friendly, dog-loving barista asks if you knew they had donuts. “Donuts?!” you excitedly ask. Yes, donuts. They’ve had them for years and you never noticed. But now you know, and now you leave the coffee shop with a donut in-hand. The day is now brighter, your drink tastes a little better, and you wonder how you lived your life without that cinnamon donut accompanying your oat milk latte.
ShootProof is the coffee shop in this scenario, and I am the dog-loving barista.
No, I don’t have a donut for you, but some of these tips might help you save time and make a little more money. And with that extra money and time, you can go buy some donuts.
5 Top Tips from ShootProof Support
My name is Katie, and I’m a ShootProof Loyalty Builder. I love that I get to help photographers in my day-to-day job because I’m not only an expert in all things ShootProof, I’m also a photographer. I understand that saving time is important, because when you work for yourself, that time is money, honey.
Here’s a list of tips and tricks that the ShootProof support team wants you to know:
#1: Upload Gallery Photos Fast with the Desktop Uploader
If you’re using the “Add Photos” button and uploading through your browser, give the Desktop Uploader Tool a try.
You can find it in your account under Photos > Tools.
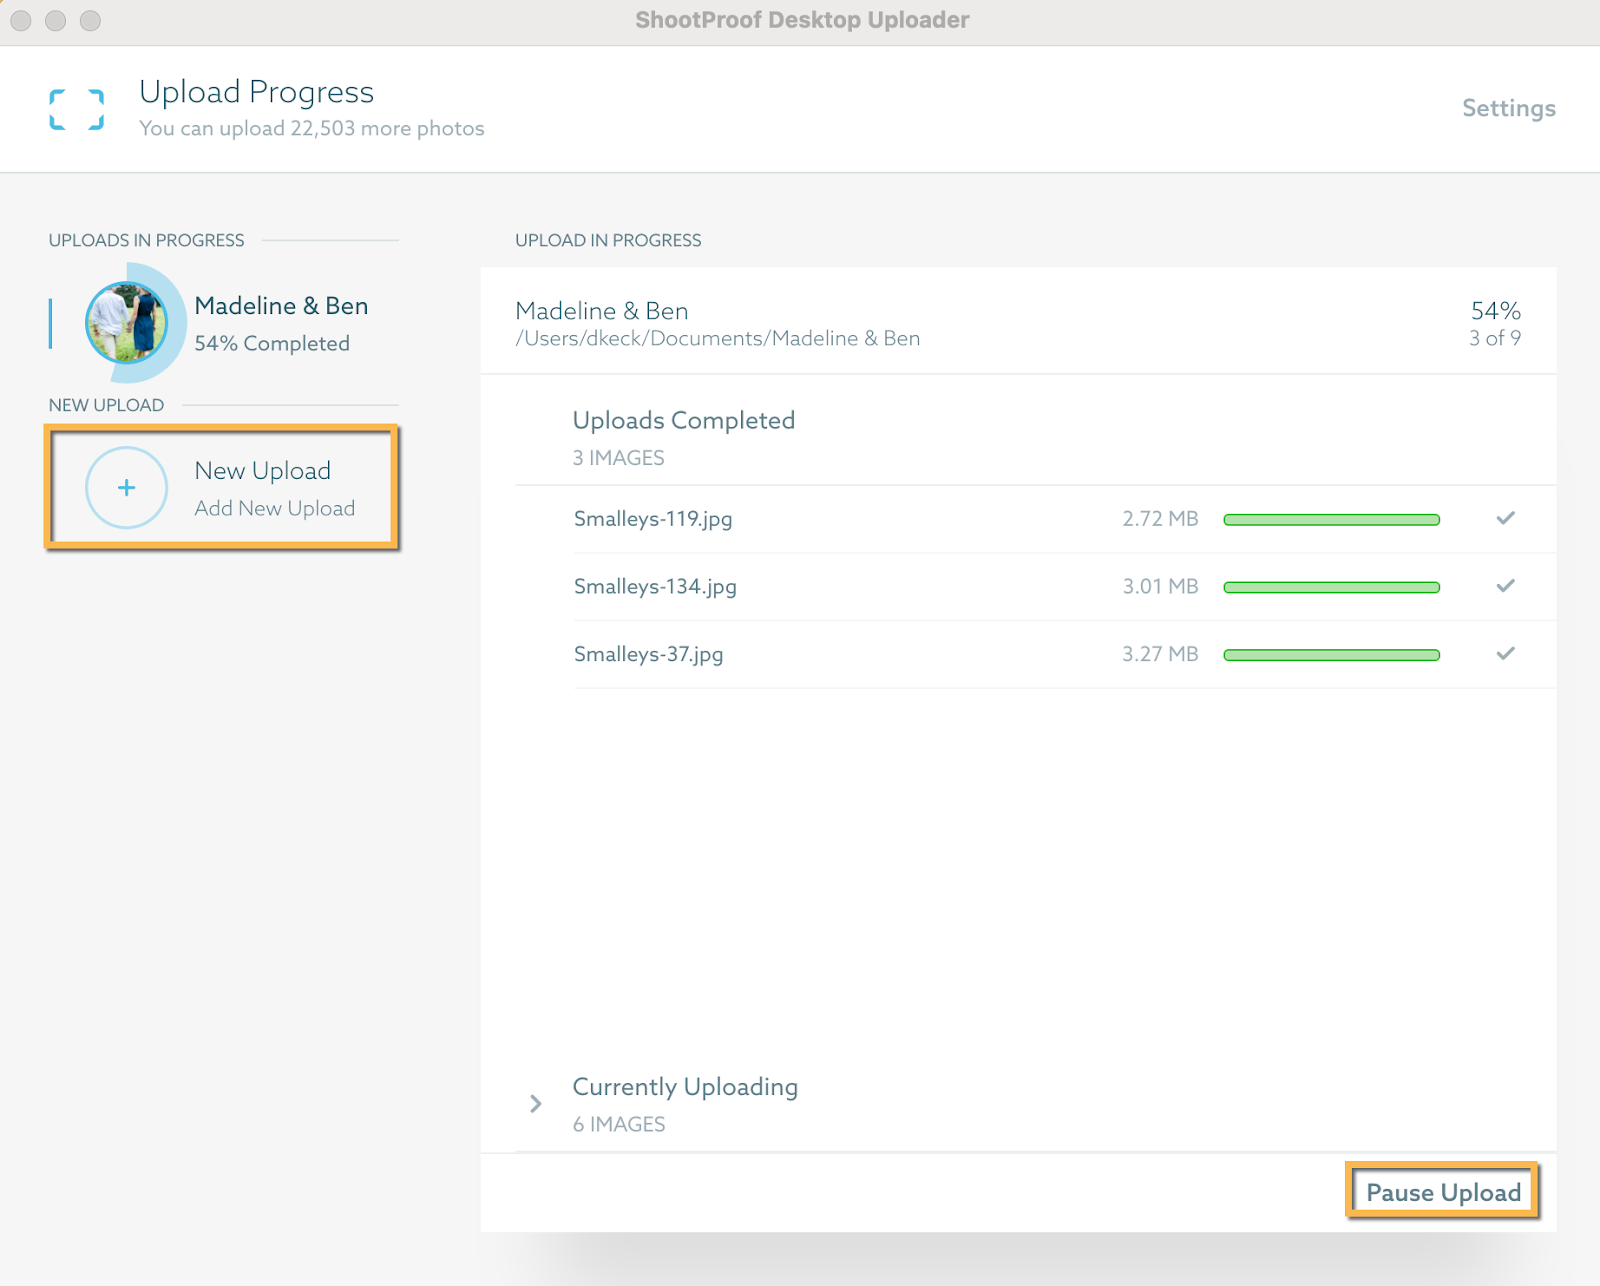
It’s quicker than uploading through the browser, and you can queue multiple galleries to be uploaded. I usually create the gallery from the Uploader and start from there. In addition to a faster upload, the Uploader can create albums based on the photo structure on your computer.
So if you’re uploading a wedding and your photos are organized in folders like “Ceremony,” “Family Portraits,” etc, you can upload the main folder and all of those folders will be created as albums within ShootProof. They’ll already be named, and the photos will be in the correct folders. Here’s more info on the Uploader tool.
#2: Save Time with Presets
A preset is a template you can use to speed up gallery creation, so you don’t need to set every single setting every single time you make a gallery.
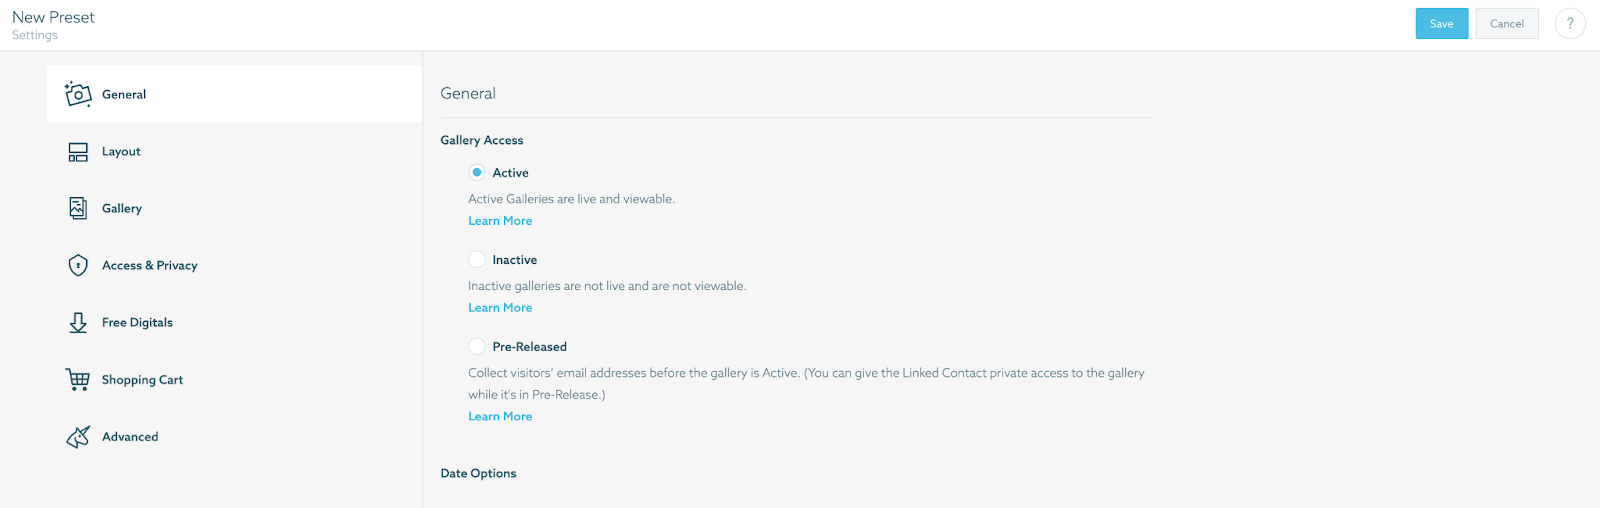
Maybe you always offer low-res downloads with a watermark for all of your events. Or maybe you like a more casual font choice for the gallery intro on your senior galleries. You can make a new preset that includes those settings. You might have one for Events, one for Senior Portraits, another for Weddings, and so on. You can also include things like which price sheet and/or email campaign to assign to the gallery.
To add a new preset, go to Photos > Galleries > Presets.
Once you’ve set up your presets, you’ll simply choose which one to use with each new gallery you create. Keep in mind any changes made to presets will only affect new galleries you create, not existing ones you’ve made with that preset.
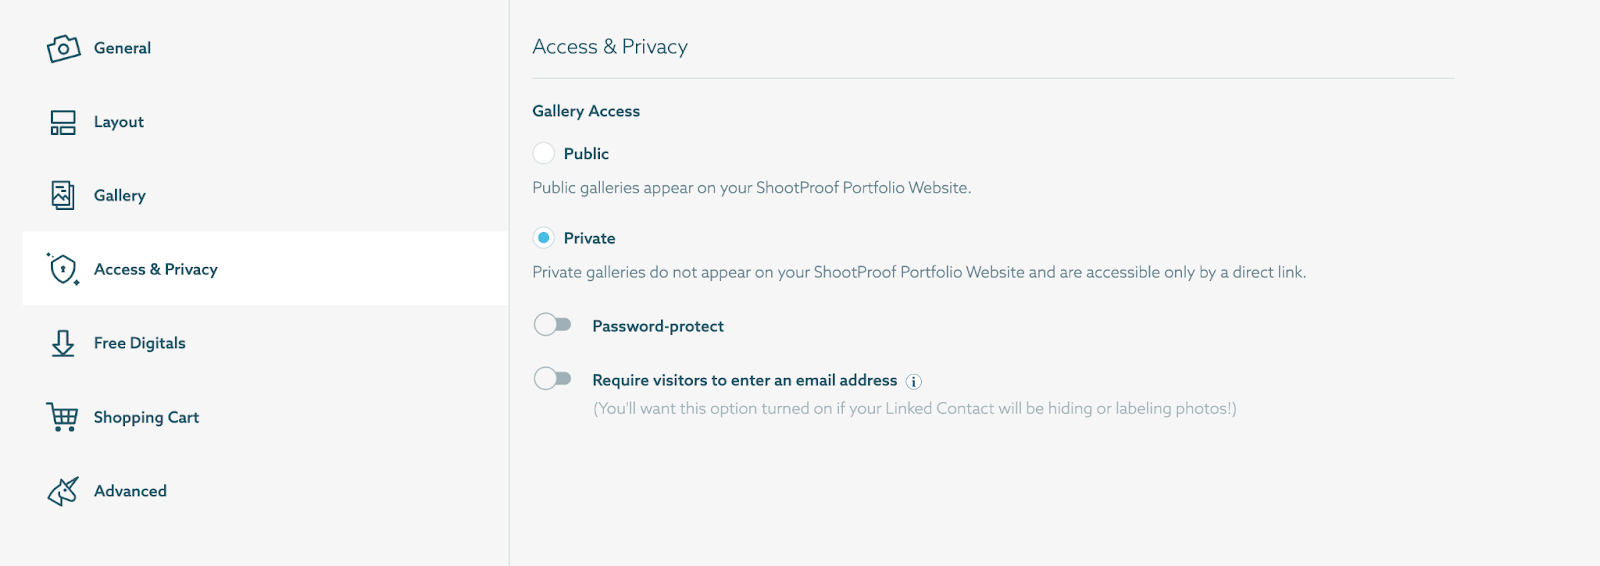
#3: Keep Private Gallery Photos Private
If you do boudoir sessions (or any kind of session that you wouldn’t want folks to stumble upon), you can make sure those photos stay private by setting the gallery to “private” and using a strong password.
Note: If the gallery is set to “public,” it will show up on your ShootProof Portfolio Website.
To ensure no private gallery slips through the cracks, you can use your presets! Make a new preset called “Boudoir” and under Access & Privacy and choose “private.”
You should also avoid using easy-to-guess passwords or using any part of the gallery name in the password. You wouldn’t want to set the password as “kim2023″ for Kim’s boudoir gallery.
Whatever you decide, keep it simple on your end, and complicated for a stranger or hacker to figure out. You could do the same type of password each time if you’d like – something like the client’s pet’s name and the last four digits of their phone number.
To set a strong password for your client’s gallery, go to Photos > Galleries > Actions (under the gallery) > Settings > Access & Privacy > Private > Add a strong password > Save.
#4: How to Set Up Free Digitals for Only Your Client
One of the most common questions we hear is, “How do I give my client X number of digitals for free?” Here’s how:
Go to Photos > Galleries > Actions (under the gallery) > Settings > Free Digitals. Click “Create Free Digital Rule.”
On the next section, choose the third option – “One Specific Person.” If the client isn’t already in your contacts, click “Create New Contact” at the top.
Next you’ll choose a template from the dropdown menu, or you make your own settings. The name should be something like “Full Resolution” or “Social Size.” You can limit the number of digital downloads here, or allow them to download them all. Click “add rule” and then save the gallery settings at the top right.
For more information on setting digital download rules, check out this Help Center article.
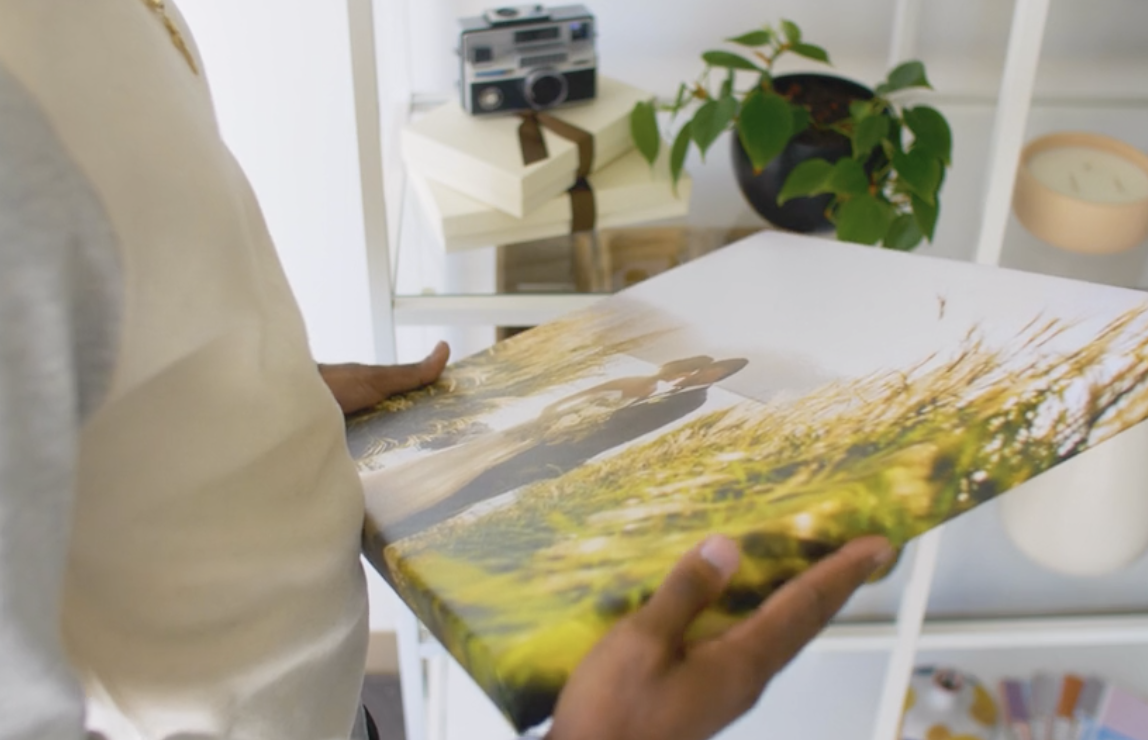
#5: “No One Buys Prints Anymore” Is a Lie… You Definitely SHOULD Sell Photo Prints Online
Your clients want printed photos; don’t let anyone tell you otherwise! Your work deserves to live on walls, not just in a phone that houses 50,000 other photos.
Offer prints.
Sell canvases.
Find a photo lab you love and use it.
And if you’re already printing but you aren’t using a ShootProof lab, try one out. It’s so much easier than going through the lab’s ordering system, re-uploading all of the photos, and sorting out the sizes, quantities, and crops.
When your clients order through ShootProof, you’ll receive an email to approve the order before anything gets sent off to the printers. You’ll check the crops, make any adjustments that might be needed, choose the shipping speed, and approve the orders. You can even replace the files they ordered with edited versions. The lab will print and ship the orders to your clients. Your clients won’t see any price, or even the name of the lab on their orders. You can also have the orders shipped to you if you’d rather deliver them yourself.
If you’re already printing with ShootProof, be sure to regularly audit your print prices . We often see studios selling prints for far too little. Yes, you want the prints to be attainable, but if you price them too low, you could be undervaluing your work and undercutting your sales!
ShootProof’s lab partner integrations make it really easy to print like a pro.
ShootProof Support Is Here for You
If you have any questions on these topics or anything else, our support team is here to help. Email us at support@shootproof.com, or give us a ring at 866-516-5130. We’re here Monday through Friday, from 9am to 5pm ET.
Now go grab yourself a coffee and a donut. Adulting and learning new things is hard, and you deserve a snack!
Contributor